Monday, July 11, 2011

Cuboids, Rectangular Prisms and Cubes

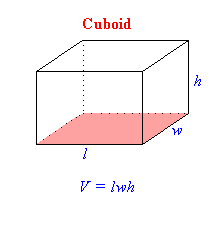
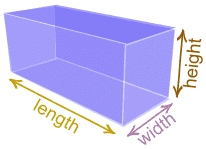
A cuboid is a box-shaped object.

It has six flat sides and all angles are right angles.

And all of its faces are rectangles.

It is also a prism because it has the same cross-section along a length. In fact it is a rectangular prism.

Examples of Cuboids

Cuboids are very common in our world, from boxes to buildings we see them everywhere. You can even fit them inside other cuboids!

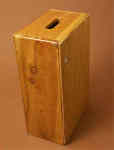
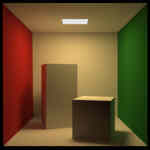
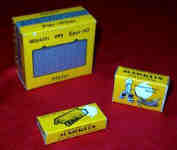
A box with a slot cut as a handle Cuboids in a cuboid room Boxes for model trains Now that's just silly!

Volume and Surface Area

The volume of a cuboid is found using the formula:

Volume = Height × Width × Length

Which is usually shortened to:

V = h × w × l

Or more simply:

V = hwl

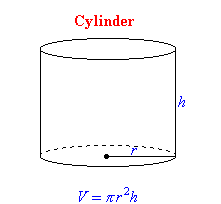
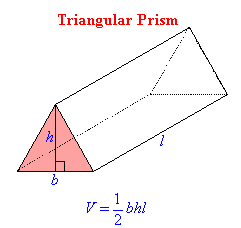
The volume of the following solids are often required to solve real world problems involving quantity, capacity, mass and strength of materials including liquids.

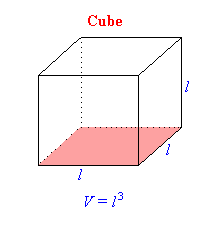
Volume of a Cube

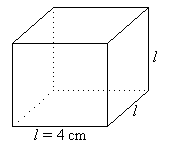
Example 25

Find the volume of a cube of side 4 cm.


Solution:


Surface Area

And the surface area is found using the formula:

A = 2wl + 2lh + 2hw

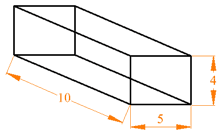
Example: Find the volume and surface area of this cuboid.


V = 4×5×10 = 200

A = 2×4×5 + 2×5×10 + 2×10×4
= 40+100+80 = 220

Sunday, July 10, 2011

Geometric of Properties

Study the Solids

In this interactive geometry investigation, students explore geometric solids and their properties. Specifically, students count the number of faces, edges, and corners (vertices) in various solids.

Learning Objectives


Students will:

  • analyze characteristics and properties of three-dimensional geometric shapes
  • count the number of faces, edges, and corners (vertices) in various geometric solids
As students are exploring the various geometric solids, begin a class discussion which includes the following points.

Students should note the following characteristics:

  • Each solid has flat sides called faces.
  • Each solid has edges to connect the faces.
  • Each solid has corners that connect the edges. (Note that the activity sheet refers to corners as "vertices", so you may wish to familiarize students with this vocabulary.)

If you have these shapes in your classroom, have students find the shapes that match those in this computer activity.

This lesson is designed to help students focus on the properties of each shape. The tools allow them to color the faces, edges, or corners (vertices) easily by holding the shift key while clicking the mouse on the paint palette and then on a face. (The edges are always white and the corners black.)

Distribute the Exploring Geometric Solids activity sheet to the students.

Exploring Geometric Solids Activity Sheet

Teacher Note: For today's lesson, students will only complete the table on the activity sheet. Save the three questions below the table for tomorrow's lesson.

As students complete the activity sheet, guide them as needed. For example, when asking "How many sides does each face have?", guide the student to click the given face, and color the sides. When determining the number of faces, it may be helpful to color the faces and count as they color. (It's interesting to observe students doing this: some color all faces the same color, while others color the faces different colors.)

After determining the number of faces, students are asked to count the number of edges and vertices (corners) in the solid. Before actually counting the number of edges, students may wish to "guess" the number.

For example, working with the dodecahedron, a student may say each face has five sides — a pentagon. She counts 12 faces. In guessing the number of edges, she may estimate 60 and give as her reason, "5 sides × 12 faces = 60 edges." Counting the edges with the result of 30 provided an opportunity to have her take a second look at the dodecahedron and find out why. (Each edge is shared by two faces.)

Taking advantage of opportunities such as these enriches student understanding.

Questions for Students


When you guessed the number of edges in a particular solid, were you correct? Did this affect how you guessed and counted the number of edges in the other solids?

[Student responses may vary. Note that students should use their incorrect guesses to inform future predictions.]

Assessment Options


  1. Collect the students' activity sheets to assess student understanding. Answers to the activity sheet are available.

Monday, July 4, 2011

fraction

Fractions are expressed as one number over another number, like this:


The number on the top is called the numerator and the number on the bottom is called the denominator.

EXAMPLE:

When you think of a fraction, think of a PIZZA!!

Suppose a pizza is cut evenly into the number of pieces in the DENOMINATOR. If the number of pieces YOU get is the NUMERATOR, the fraction of the pizza you get is:


Adding and taking away (subtracting) fractions can be pictured using slices of pizza. For example:


Multiplying fractions means cutting a portion into smaller portions. For example:


Unit 1 show you how to do this multiplication.

Dividing fractions means determining how many smaller pieces there are in a larger piece. For example:


Add and subtract like fractions

It's easy to add and subtract like fractions, or fractions with the same denominator. You just add or subtract the numerators and keep the same denominator. The tricky part comes when you add or subtract fractions that have different denominators. To do this, you need to know how to find the least common denominator. In an earlier lesson, you learned how to simplify, or reduce, a fraction by finding an equivalent, or equal, fraction where the numerator and denominator have no common factors. To do this, you divided the numerator and denominator by their greatest common factor.

In this lesson, you'll learn that you can also multiply the numerator and denominator by the same factor to make equivalent fractions.

Example 1
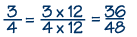
In this example, since 12 divided by 12 equals one, and any number multiplied by 1 equals itself, we know 36/48 and 3/4 are equivalent fractions, or fractions that have the same value. In general, to make an equivalent fraction you can multiply or divide the numerator and denominator of the fraction by any non-zero number.

Since only like fractions can be added or subtracted, we first have to convert unlike fractions to equivalent like fractions. We want to find the smallest, or least, common denominator, because working with smaller numbers makes our calculations easier. The least common denominator, or LCD, of two fractions is the smallest number that can be divided by both denominators. There are two methods for finding the least common denominator of two fractions:

Example 2

Method 1:
Write the multiples of both denominators until you find a common multiple.

The first method is to simply start writing all the multiples of both denominators, beginning with the numbers themselves. Here's an example of this method. Multiples of 4 are 4, 8, 12, 16, and so forth (because 1 × 4=4, 2 × 4=8, 3 × 4=12, 4 × 4=16, etc.). The multiples of 6 are 6, 12,…--that's the number we're looking for, 12, because it's the first one that appears in both lists of multiples. It's the least common multiple, which we'll use as our least common denominator.

Method 2:
Use prime factorization.

For the second method, we use prime factorization-that is, we write each denominator as a product of its prime factors. The prime factors of 4 are 2 times 2. The prime factors of 6 are 2 times 3. For our least common denominator, we must use every factor that appears in either number. We therefore need the factors 2 and 3, but we must use 2 twice, since it's used twice in the factorization for 4. We get the same answer for our least common denominator, 12.

Example 3

prime factorization of 4 = 2 × 2
prime factorization of 6 = 2 × 3
LCD = 2 × 2 × 3 = 12

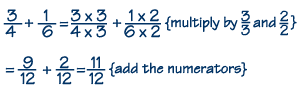
Now that we have our least common denominator, we can make equivalent like fractions by multiplying the numerator and denominator of each fraction by the factor(s) needed. We multiply 3/4 by 3/3, since 3 times 4 is 12, and we multiply 1/6 by 2/2, since 2 times 6 is 12. This gives the equivalent like fractions 9/12 and 2/12. Now we can add the numerators, 9 + 2, to find the answer, 11/12.

Example 4

Example 1


Example 2


Example 3


Example 4

Angle

Angles

An angle measures the amount of turn

Names of Angles

As the Angle Increases, the Name Changes

Type of Angle Description
Acute Angle
an angle that is less than 90°
Right Angle
an angle that is 90° exactly
Obtuse Angle
an angle that is greater than 90° but less than 180°
Straight Angle
an angle that is 180° exactly
Reflex Angle
an angle that is greater than 180°

types of angle


Be Careful What You Measure

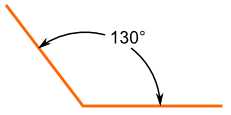
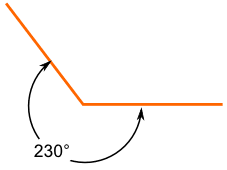
Obtuse Angle Reflex Angle
This is an Obtuse Angle.
And this is a Reflex Angle.

But the lines are the same ... so when naming the angles make sure
that you know which angle is being asked for!


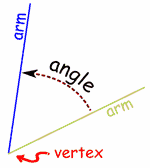
Parts of an Angle

The corner point of an angle is called the vertex

And the two straight sides are called arms

The angle is the amount of turn between each arm.

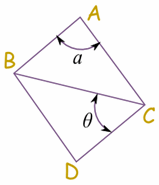
Labelling Angles

There are two main ways to label angles:

1. by giving the angle a name, usually a lower-case letter like a or b, or sometimes a Greek letter like α (alpha) or θ (theta)

2. or by the three letters on the shape that define the angle, with the middle letter being where the angle actually is (its vertex).

Example angle "a" is "BAC", and angle "θ" is "BCD"


Degrees (Angles)

We can measure Angles in Degrees.

There are 360 degrees in one Full Rotation (one
complete circle around).

(Angles can also be measured in Radians)

(Note: "Degrees" can also mean Temperate, but here we are talking about Angles)

The Degree Symbol: °

We use a little circle ° following the number to mean degrees.

For example 90° means 90 degrees

One Degree

1 Degree
This is how large 1 Degree is

The Full Circle

A Full Circle is 360°

Half a circle is 180°
(called a Straight Angle)

Quarter of a circle is 90°
(called a Right Angle)

Full Circle Degrees

Why 360 degrees? Probably because old calendars (such as the Persian Calendar) used 360 days for a year - when they watched the stars they saw them revolve around the North Star one degree per day.

Measuring Degrees

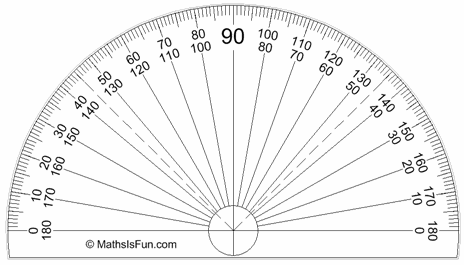
We often measure degrees using a protractor:

Protractor
The normal protractor measures 0° to 180°

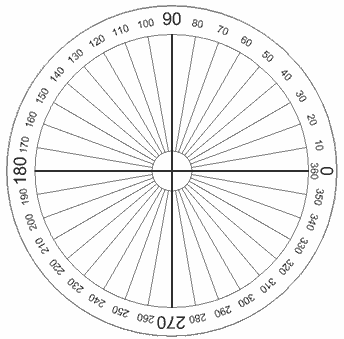
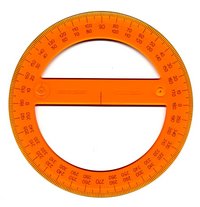
Full Circle Protractor

You can also get full-circle protractors.

But they are not as commonly used because they are a bit


Supplementary Angles

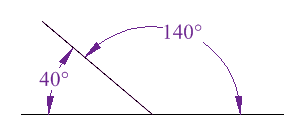
Two Angles are Supplementary if they add up to 180 degrees.


These two angles (140° and 40°) are Supplementary Angles, because they add up to 180°.

Notice that together they make a straight angle.

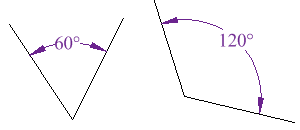
But the angles don't have to be together.

These two are supplementary because 60° + 120° = 180°


If the two angles add to 180°, we say they "Supplement" each other.
Supplement
comes from Latin supplere, to complete or "supply" what is needed.
Spelling: be careful, it is not "Supplimentary Angle" (with an "i")

Complementary Angles

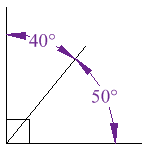
Two Angles are Complementary if they add up to 90 degrees (a Right Angle).


These two angles (40° and 50°) are Complementary Angles, because they add up to 90°.

Notice that together they make a right angle.

But the angles don't have to be together.

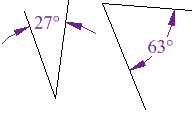
These two are complementary because 27° + 63° = 90°


Right Angled Triangle

In a right angled triangle, the two acute angles are complementary, because in a triangle the three angles add to 180°, and 90° have been taken by the right angle.

say If the two angles add to 90°, we say they "Complement" each other.

Complementary
comes from Latin completum meaning "completed" ... because the right angle is thought of as being a complete (full) angle.
spell Spelling: be careful, it is not "Complimentary Angle" (with an "i") ... that would be an angle you get for free!

Complementary vs Supplementary

Note: A related idea is supplementary Angles - those add up to 180°

How can you remember which is which? Easy! Think:

  • "C" of Complementary stands for "Corner" right angle(a Right Angle), and
  • "S" of Supplementary stands for "Straight" (180 degrees is a straight line)

Parallel Lines, and Pairs of Angles

Parallel Lines

Lines are parallel if they are always the same distance apart (called "equidistant"), and will never meet. Just remember:

Always the same distance apart and never touching.

The red line is parallel to the blue line in both these cases:

Parallel Example 1
Parallel Example 2
Example 1

Example 2

Parallel lines also point in the same direction.


Pairs of Angles

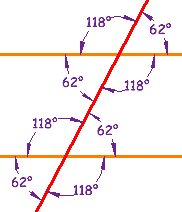
When parallel lines get crossed by another line, you can see that many angles are the same, as in this example:

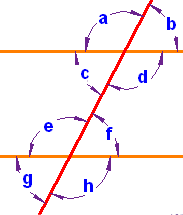
These angles can be made into pairs of angles which have special names.


Testing for Parallel Lines

Some of those special pairs of angles can be used to test if lines really are parallel:

If Any Pair Of ... Example:
Corresponding Angles are equal, or a = e
Alternate Interior Angles are equal, or c = f
Alternate Exterior Angles are equal, or b = g
Alternate Interior Angles add up to 180° d + f = 180°
... then the lines are Parallel

Examples

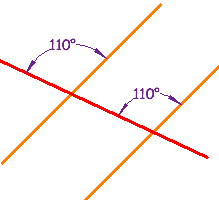
These lines are parallel, because a pair of corresponding angles are equal.
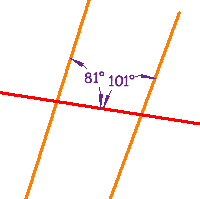
These lines are not parallel, because a pair of Consecutive Interior Angles do not add up to 180° (81° + 101° =182°)
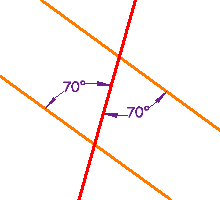
These lines are parallel, because a pair of Alternate Interior Angles are equal
Example 1


Example 2